Week 10 - Protein Structure Prediction with Homology Modeling
Homology modeling (comparative modeling) predicts the 3D structure of a protein using the known structure of a related homolog as a template. Modeller, developed by the Šali Lab, is one of the most widely used programs for this purpose. It generates 3D models by satisfaction of spatial restraints extracted from template alignments (Šali & Blundell, J Mol Biol 1993).
A condition for homology modeling is at least 25–30% sequence identity between the target and the template. Below this threshold, alignment errors dominate and model quality degrades rapidly.
Tip
Educational Tip: Why Not Just Use AlphaFold? AlphaFold is an incredible tool, but homology modeling remains essential in structural biology. It lets you choose specific templates (e.g., a particular conformational state or ligand-bound form), model multi-chain complexes with known stoichiometry, and directly incorporate ligands/cofactors from template structures. Understanding homology modeling also builds the conceptual foundation for appreciating how structure prediction works.
How Modeller Works — Modeling by Satisfaction of Spatial Restraints
Modeller implements an automated approach to comparative modeling through three key steps (Figure 1):
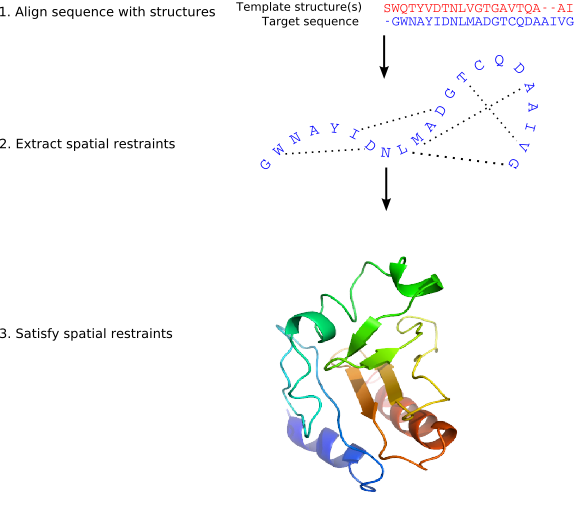
Step 1 — Alignment: The target sequence is aligned with one or more template structures of known 3D conformation.
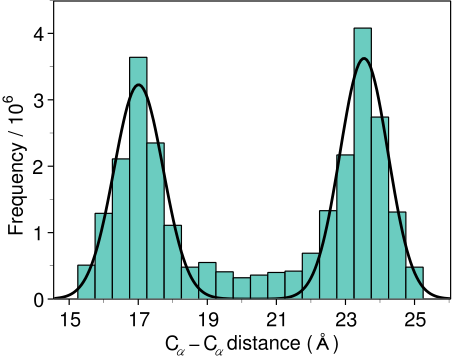
Step 2 — Restraint Extraction: Distance and dihedral angle restraints are derived from the alignment. These restraints are expressed as probability density functions (pdfs) obtained from a statistical analysis of 416 known protein structure pairs. For example, the pdf for a Cα–Cα distance in the target depends on the equivalent distances in the templates (Figure 2).
Step 3 — Optimization: The spatial restraints and CHARMM energy terms (enforcing proper stereochemistry) are combined into an objective function. The model is obtained by optimizing this function in Cartesian space using the variable target function method — first with conjugate gradients (satisfying local restraints first), then with molecular dynamics and simulated annealing for refinement (Figure 3).

Multiple slightly different models can be generated by varying the initial structure. The variability among models provides an estimate of errors in each region of the fold.
Info
Key Modeller Capabilities (from the Modeller 10.7 Manual):
- Comparative (homology) modeling with single or multiple templates
- De novo loop modeling and loop refinement
- Model assessment via GA341, DOPE, and zDOPE statistical potentials
- Multiple sequence/structure alignment and clustering
- Inclusion of ligands, water molecules, and disulfide bridges
- Multi-chain (homo/hetero-multimer) modeling
0. Setup: Obtaining a Modeller License Key
Before using Modeller (either standalone or through ChimeraX), you need a free academic license key.
- Go to the Modeller registration page: https://www.salilab.org/modeller/registration.html
- Fill in your name, institution, and academic email address.
- You will receive a license key (e.g.,
MODELLERKEY) via email.
Entering the Key in ChimeraX
You only need to do this once; the key is saved in your preferences.
Via GUI: 1. Go to Tools → Structure Prediction → Modeller Comparative. 2. In the dialog, paste your license key into the Modeller license key field.
Via Command Line:
The licenseKey option is not a standalone command — it must be appended to an actual modeling run. The easiest way to register your key for the first time is through the GUI dialog above. Once saved, ChimeraX remembers it permanently.
Alternatively, you can include it the first time you run a modeling job:
# The licenseKey option is passed alongside an actual modeling command
modeller comparative <your_sequence_spec> licenseKey MODELLERKEY
MODELLERKEY with your actual key.)
Warning
Running modeller comparative licenseKey MODELLERKEY by itself will fail with No sequences match 'licenseKey' — because ChimeraX interprets licenseKey as the target sequence name. Always specify the target sequence first, or use the GUI to set the key.
Info
ChimeraX can run Modeller in two ways:
- Web Service (default): Sends the job to UCSF RBVI servers — no local installation required.
- Local Machine: Requires Modeller 10+ installed locally. Set Computation location → local machine in the GUI and provide the Executable location, or use the
executableLocationoption on the command line.
macOS (Homebrew): If you installed Modeller via brew install modeller, the executable path is:
/opt/homebrew/opt/modeller/bin/mod10.8
/usr/bin/mod10.8 or wherever your package manager installed it.
You can verify the path in your terminal: ls /opt/homebrew/opt/modeller/bin/mod*
1. The Modeling Target: TvLDH
Throughout this lab, we use TvLDH (Trichomonas vaginalis lactate dehydrogenase) as our modeling target — the same system used in the official Modeller tutorial. TvLDH is an ideal example because:
- It shares ~45% sequence identity with malate dehydrogenases (e.g.,
1bdm:A) — well within the reliable modeling range. - Multiple related templates exist, enabling multi-template and validation exercises.
- Crucially, an experimental crystal structure of TvLDH was later resolved (4UUM, 100% sequence identity). This allows us to build a model "blind" using only the MDH templates, and then validate our model against the real structure — a rare and powerful learning opportunity.
Important: Do NOT use 4UUM as a template!
The structure 4UUM is the actual TvLDH crystal structure. In a real scenario, if you know the target's structure already exists, there's no need for homology modeling. Here, we intentionally exclude 4UUM from our templates to simulate a genuine modeling exercise, then use it at the end for validation.
The TvLDH FASTA sequence:
>TvLDH
MSEAAHVLITGAAGQIGYILSHWIASGELYGDRQVYLHLLDIPPAMNRLTALTMELEDCAFPHLAGFVATTDPKAAFKDIDCAFLVASMPLKPGQVRADLISSNSVIFKNTGEYLSKWAKPSVKVLVIGNPDNTNCEIAMLHAKNLKPENFSSLSMLDQNRAYYEVASKLGVDVKDVHDIIVWGNHGESMVADLTQATFTKEGKTQKVVDVLDHDYVFDTFFKKIGHRAWDILEHRGFTSAASPTKAAIQHMKAWLFGTAPGEVLSMGIPVPEGNPYGIKPGVVFSFPCNVDKEGKIHVVEGFKVNDWLREKLDFTEKDLFHEKEIALNHLAQGG
Tip
Save this sequence to a file named TvLDH.fasta on your computer — you will need it in the steps below.
2. Finding a Template Structure
The first and most critical step in homology modeling is identifying a suitable template — a protein with known 3D structure that is homologous to your target.
Route A: Web-Based Template Search (NCBI BLAST)
- Go to https://blast.ncbi.nlm.nih.gov/Blast.cgi and select protein BLAST.
- Paste the TvLDH FASTA sequence above.
- Under Database, select Protein Data Bank proteins (pdb).
- Click BLAST.
- In the results, you will find
4UUMat 100% identity (the actual TvLDH structure — do NOT use this as a template), along with several malate dehydrogenases. Key templates:
| PDB Code | Protein | Seq. Identity | Resolution | Use as |
|---|---|---|---|---|
| 4UUM | TvLDH (T. vaginalis) | 100% | 1.4 Å | ⚠️ Validation only |
| 1bdm:A | Malate dehydrogenase (B. stearothermophilus) | ~45% | 1.8 Å | ✅ Template |
| 1b8p:A | Malate dehydrogenase (C. vibrioforme) | ~42% | 1.9 Å | ✅ Template |
| 7mdh:A | Malate dehydrogenase (E. coli) | ~34% | 2.4 Å | ⚠️ Legacy PDB (may cause errors) |
Info
Why 1bdm:A? It combines the highest sequence identity (~45%) among non-TvLDH structures with a good crystallographic R-factor (16.9%), making it the best single template. 4UUM is reserved for validation in Section 6.
Route B: Template Search in ChimeraX (Blast Protein)
ChimeraX integrates a BLAST search that can find PDB templates directly.
Via GUI:
1. Open the TvLDH sequence: File → Open → select TvLDH.fasta.
2. The Sequence Viewer opens with the TvLDH sequence.
3. In the Sequence Viewer, go to Info → BLAST Protein...
4. Set the database to pdb and click OK.
5. When results appear, note 1bdm among the top hits. Click on it to fetch the template structure.
Via Command Line:
# Open the target sequence from a local FASTA file
open TvLDH.fasta

# BLAST the sequence against the PDB to find templates
blastprotein #1 database pdb
Known Issue: HTTP Error 415
If you receive HTTP Error 415: Unsupported Media Type, this indicates a server communication issue. Try updating to the latest ChimeraX daily build, or fall back to Route A.
3. Building a Homology Model — Single Template (via ChimeraX)
Once you have identified a template, ChimeraX integrates directly with Modeller to build the model — no external software needed.
Example 1: Model TvLDH using 1bdm:A as template
Step 1: Open the Template Structure
Via Command Line:
# Open the template structure from the PDB
open 1bdm
Tip
After opening 1bdm, keep only chain A (the monomer used for modeling):
delete ~#1/A
delete solvent
Step 2: Load the Target Sequence and Create the Alignment
Via Command Line:
# Open the TvLDH target sequence
open TvLDH.fasta
ChimeraX will open the sequence in the Sequence Viewer. Since TvLDH shares ~45% identity with 1bdm:A, ChimeraX will automatically associate the template structure with the target sequence and generate a pairwise alignment. You should see both sequences aligned together in the Sequence Viewer.
Manually associating a structure with a sequence:
If automatic association does not work (e.g., the sequences are too divergent), use the sequence associate command. This command explicitly links a structure chain to a specific sequence in the Sequence Viewer, enabling synchronized selection, alignment-based superposition, and Modeller input generation.
# Associate chain A with a specific sequence in a specific alignment
# Format: sequence associate #MODEL/CHAIN alignment-ID:sequence-name
sequence associate #1/A TvLDH.fasta:TvLDH
Info
What does sequence associate do?
It creates a mapping between 3D structure residues and alignment positions. Once associated, selecting residues in the 3D view highlights them in the Sequence Viewer (and vice versa). More importantly, Modeller uses these associations to determine which structures serve as templates and which sequence is the modeling target.
Info
What if automatic association fails? Use the GUI approach — it is the most reliable:
- Open the target FASTA:
open TvLDH.fasta(appears in the Sequence Viewer). - In the Sequence Viewer window showing TvLDH, go to the context menu (right-click) → Associations → select the template chain (e.g.,
1bdm chain A) to force the association.
Alternatively, via the command line, you must specify which alignment to associate with (shown in the Sequence Viewer title bar). Without this, sequence associate may match the wrong sequence:
# Associate chain A with a specific sequence in a specific alignment
# Replace ALIGNMENT_ID with the title shown in the Sequence Viewer window
sequence associate #1/A ALIGNMENT_ID:TvLDH
Step 3: Run Modeller Comparative Modeling
Via GUI:
1. Go to Tools → Structure Prediction → Modeller Comparative.
2. Select the alignment containing TvLDH and 1bdm sequences.
3. Choose TvLDH as the target sequence.
4. Set Number of models to 5.
5. Ensure your license key is entered.
6. Click OK to submit the job.
Via Command Line:
# Run comparative modeling (5 models, local execution)
modeller comparative TvLDH.fasta:TvLDH numModels 5 executableLocation /opt/homebrew/opt/modeller/bin/mod10.8
Tip
Quick Test Run: To verify your alignment is reasonable before a full run:
modeller comparative TvLDH.fasta:TvLDH fast true executableLocation /opt/homebrew/opt/modeller/bin/mod10.8
Info
The target sequence is specified as alignment-ID:sequence-name — here TvLDH.fasta is the alignment name shown in the Sequence Viewer title bar, and TvLDH is the sequence name within it.
Note
The executableLocation /opt/homebrew/opt/modeller/bin/mod10.8 path is for macOS with Homebrew. On other systems, adjust accordingly:
- Linux (apt/rpm):
/usr/bin/mod10.8 - Conda:
$CONDA_PREFIX/bin/mod10.8 - Windows:
C:\Program Files\Modeller10.8\bin\modXXX.exe
Omit executableLocation entirely to use the RBVI web service instead of a local installation.
Step 4: Examine the Results
When modeling completes, ChimeraX will:
- Open all generated models as a model group (e.g.,
#4with sub-models#4.1–#4.5) in the graphics window. - Automatically superimpose them onto the template using MatchMaker. The Log panel will report both the pruned atom pairs RMSD (core fit) and the overall RMSD (all matched pairs) for each superposition.
- Display a Modeller Results panel with quality scores:
| Score | Meaning | Good Value |
|---|---|---|
| GA341 | Statistical potential model score (0–1) | > 0.7 (≥95% probability of correct fold) |
| zDOPE | Normalized atomic distance-dependent energy | < 0 (reliable model) |
| molpdf | Modeller objective function | Lower is better (relative, not absolute) |
- Click a row in the Results panel to show only that model.
- Click column headers to sort models by score.
- Right-click → Fetch Additional Scores to obtain three additional metrics from the SaliLab Model Evaluation Server:
| Additional Score | Meaning |
|---|---|
| predicted RMSD | TSVMod-predicted Cα RMSD of the model from the (unknown) native structure |
| predicted NO35 | TSVMod-predicted native overlap at 3.5 Å — the fraction of Cα atoms within 3.5 Å of native after superposition |
| GA341 / zDOPE | Re-evaluated if missing for any models |
Tip
You can also fetch these additional scores via the command line:
modeller scores #4
Info
Interpreting Scores: GA341 scores always range from 0 to 1 (native-like). DOPE and molpdf are relative — they can only rank models from the same alignment. For TvLDH at 45% identity, expect GA341 ≈ 1.0 and zDOPE < 0.
MatchMaker RMSD (reported in the Log): The pruned RMSD reflects the best-superimposed core residues (typically < 1 Å between models from the same run). The overall RMSD includes loop deviations and is usually larger.
Step 5: Visualize the Model
# Select the best model (e.g., lowest zDOPE — adjust #2 as needed)
matchmaker #2 to #1 showAlignment true

# Color to distinguish: model = cornflowerblue, template = tan
color #1 tan
color #2 cornflowerblue

# Publication-quality rendering
cartoon
lighting soft
graphics silhouettes true
Examine the Sequence Alignment in the Sequence Viewer (from matchmaker showAlignment):
- Conserved core (Rossmann fold β-sheets, α-helices) — should align well.
- Active site loop (residues ~90–100) — likely poorly modeled because this loop is disordered in the 1bdm template. This is the motivation for multi-template and loop refinement (Sections 4 and 5).
- Terminal extensions — delete untemplated tails if they appear as extended conformations.
4. Multi-Template Modeling (via ChimeraX)
Using multiple templates generally improves model quality because:
- Multiple sequence alignments are more accurate than pairwise alignments.
- Structural aberrations in individual templates get averaged out.
- Different templates may cover different regions (especially loops) better.
Example 2: Model TvLDH using two MDH templates
We'll use 1bdm:A (45% identity) and 1b8p:A (42%) — covering different conformational states of the active site loop. Optionally, add 4mdh:A (Sus scrofa cytoplasmic MDH, ~43% identity) as a third template for broader structural coverage.
Step 1: Open All Templates
# Open template structures
open 1bdm
open 1b8p
# Optional third template (Sus scrofa, cytoplasmic MDH):
# open 4mdh

# Keep only chain A from each
delete ~/A
delete solvent
Step 2: Open Target Sequence and Create Alignment
# Open TvLDH target sequence
open TvLDH.fasta
ChimeraX will associate the target with the template structures and create a multiple alignment. Verify in the Sequence Viewer that all sequences (TvLDH + templates) are aligned together.
Tip
If automatic association doesn't pick up all templates, use the Sequence Viewer's Structure → Associations menu to manually associate each template.
Step 3: Run Multi-Template Modeling
Via GUI: 1. Tools → Structure Prediction → Modeller Comparative. 2. Select the alignment with all sequences. 3. Choose TvLDH as target. 4. Click OK — Modeller will automatically use all associated structures as templates.
Via Command Line:
# All associated structures are automatically used as templates
modeller comparative TvLDH.fasta:TvLDH numModels 5 executableLocation /opt/homebrew/opt/modeller/bin/mod10.8
Step 4: Compare Single vs. Multi-Template Models
# Superimpose the best multi-template model on the single-template model
matchmaker #4 to #2 showAlignment true

# Color to compare
color #2 salmon
color #4 dodgerblue
Examine the active site loop region (residues 90–100). The multi-template model should show improved conformation here because Modeller can use loop information from templates where this region is resolved.
5. Loop Refinement (via ChimeraX)
Loops are the hardest regions to model because they have few homology restraints. ChimeraX provides the modeller loops (or modeller refine) command for ab initio loop refinement.
After building your model (from Section 3 or 4), identify poorly modeled loops by examining the zDOPE profile or by visual inspection.
Requirements for Loop Modeling
The modeller loops command uses the same alignment-ID:sequence-name format as comparative modeling, followed by a colon and a region specifier:
modeller loops alignment-ID:sequence-name:region [options]
Where region can be:
internal(orinternal-missing) — all non-terminal missing segmentsall(orall-missing) — all missing segments including termini- Explicit positions — comma-separated Sequence Viewer position indices (e.g.,
90-100)
Common Errors
modeller loops #4 numModels 5→ fails because#4is a model-spec, not a sequence-spec. The loops command needsalignment-ID:sequence-name:regionformat.modeller loops 1:TvLDH:internal→ fails if the alignment ID is not1. Check the Sequence Viewer title bar for the actual alignment ID.
Complete Models Have No Missing Segments
If your comparative model was built successfully with all residues modeled (no gaps), then internal and all will produce the error no atoms selected for optimization — there are simply no missing segments to fill in.
In that case, specify explicit residue positions for the loop region you want to refine (e.g., the active site loop at positions 90–100):
modeller loops TvLDH.fasta:TvLDH:90-100 numModels 5 executableLocation /opt/homebrew/opt/modeller/bin/mod10.8
Refining a Loop Region
# Refine specific residues (active site loop, positions 90–100)
modeller loops TvLDH.fasta:TvLDH:90-100 numModels 5 executableLocation /opt/homebrew/opt/modeller/bin/mod10.8

# If the model has missing internal segments (gaps in the structure):
modeller loops TvLDH.fasta:TvLDH:internal numModels 5 executableLocation /opt/homebrew/opt/modeller/bin/mod10.8

# Refine ALL missing segments (including terminal extensions):
modeller loops TvLDH.fasta:TvLDH:all numModels 3 adjacent 0 executableLocation /opt/homebrew/opt/modeller/bin/mod10.8
Tip
Which loops to refine? Look for regions with high zDOPE values (positive) in the Modeller Results panel, or visually inspect the superposition for loops that diverge significantly from the template.
Tip
Use the GUI for easier setup: Tools → Structure Prediction → Model Loops provides a dropdown interface where you can select the alignment, sequence, and region without worrying about the command-line syntax.
6. Validating the Model Against the Experimental Structure (4UUM)
Since the experimental crystal structure of TvLDH has been resolved as 4UUM, we can now rigorously validate our homology model by superimposing it onto the real structure.
Step 1: Fetch the Experimental Structure
# Open the real TvLDH crystal structure, for simplicity, I closed other structures first.
open 4uum
Step 2: Superimpose Model onto Experimental Structure
# Superimpose your best model onto 4UUM
# Adjust model numbers to match your session (check the Model Panel)
matchmaker #4.4 to #1 showAlignment true
Tip
Adjust the model number (#4.4) to whichever sub-model had the best zDOPE or GA341 score from Section 3 or 4. The #4 group contains sub-models #4.1–#4.5.
Step 3: Calculate and Visualize RMSD
# Global RMSD is reported in the Log panel by matchmaker
# For per-residue deviation, color by the seq_rmsd attribute (set by matchmaker):
color byattribute seq_rmsd #4.4

# Add a color key legend
key blue:0 white:2 red:5 numericLabelSpacing proportional
The seq_rmsd attribute (computed by matchmaker with showAlignment true) gives the Cα displacement at each aligned residue. Regions colored blue are well-modeled (< 1 Å deviation); red regions have high deviation (> 4 Å).
Step 4: Identify Well-Modeled vs. Poorly Modeled Regions
# Isolate the high-RMSD regions for inspection
select #4.4 & @@seq_rmsd>3.0
color sel red
show sel
Info
What RMSD to expect? For a model at ~45% sequence identity, a global Cα RMSD of 1.0–2.0 Å over the core is typical. Loop regions may deviate by 3–8 Å. If your multi-template model (Section 4) gives lower RMSD than the single-template model, the improvement is meaningful.
7. Understanding the Alignment Format
Modeller uses the PIR (Protein Information Resource) format for alignments. When you work through ChimeraX, the alignment is generated automatically. However, understanding PIR format is essential for advanced work and troubleshooting.
A PIR alignment file looks like this (from the Modeller manual):
C; A sample alignment in the PIR format

>P1;5fd1
structureX:5fd1:1    :A:106  :A:ferredoxin:Azotobacter vinelandii: 1.90: 0.19
AFVVTDNCIKCKYTDCVEVCPVDCFYEGPNFLVIHPDECIDCALCEPECPAQAIFSEDEVPEDMQEFIQLNAELA
EVWPNITEKKDPLPDAEDWDGVKGKLQHLER*

>P1;1fdx
sequence:1fdx:1    :A:54   :A:ferredoxin:Peptococcus aerogenes: 2.00:-1.00
AYVINDSC--IACGACKPECPVNIIQGS--IYAIDADSCIDCGSCASVCPVGAPNPED-----------------
-------------------------------*
Each entry has:
- Header line:
>P1;code— the sequence code - Description line:
structureX:pdbcode:startRes:chain:endRes:chain:name:source:resolution:rfactorfor templates, orsequence:code:...for the target - Sequence: one-letter amino acid codes, with
-for gaps and*to mark the end
Tip
When using ChimeraX, you don't need to write PIR files manually — ChimeraX handles the alignment generation internally. But if you have pre-made alignments from external tools, you can open them directly:
open my_alignment.pir
8. Summary of Key ChimeraX Commands
| Task | Command |
|---|---|
| Open a FASTA sequence | open TvLDH.fasta |
| BLAST against PDB | blastprotein #1 database pdb |
| Open a PDB template | open PDBID |
| Associate structure with sequence | sequence associate #MODEL/CHAIN |
| Run comparative modeling | modeller comparative ALN_ID:SEQ_NAME numModels N executableLocation ... |
| Fast/approximate mode | modeller comparative ALN_ID:SEQ_NAME fast true |
| Set license key (once) | Use GUI: Tools → Structure Prediction → Modeller Comparative (or append licenseKey YOUR_KEY to any modeling command) |
| Include ligands from template | modeller comparative ALN_ID:SEQ_NAME hetPreserve true |
| Refine loops (specific region) | modeller loops ALN_ID:SEQ_NAME:90-100 numModels N |
| Refine loops (internal missing) | modeller loops ALN_ID:SEQ_NAME:internal numModels N |
| Refine loops (all missing) | modeller loops ALN_ID:SEQ_NAME:all numModels N adjacent 0 |
| Fetch additional scores (NO35, RMSD) | modeller scores #MODEL |
| Superimpose model on template | matchmaker #MODEL to #TEMPLATE showAlignment true |
| Run locally (macOS Homebrew) | Append executableLocation /opt/homebrew/opt/modeller/bin/mod10.8 |
9. Python Showcase: Automated ChimeraX Pipeline
You can script the entire ChimeraX workflow in the Python shell (Tools → General → Shell):
from chimerax.core.commands import run

# Step 1: Open the template structure
_ = run(session, 'open 1bdm')
_ = run(session, 'delete ~#1/A')
_ = run(session, 'delete solvent')

# Step 2: Open the target sequence
_ = run(session, 'open TvLDH.fasta')

# Step 3: Run Modeller comparative modeling (5 models)
_ = run(session, 'modeller comparative TvLDH.fasta:TvLDH numModels 5 block true')

# Step 4: Superimpose best model on template and visualize
_ = run(session, 'matchmaker #2 to #1 showAlignment true')
_ = run(session, 'color #1 tan')
_ = run(session, 'color #2 cornflowerblue')
_ = run(session, 'lighting soft')
_ = run(session, 'graphics silhouettes true')

print("Homology modeling complete! Check the Modeller Results panel for scores.")
10. Advanced: Standalone Modeller Python Workflows
For tasks beyond what ChimeraX can do — profile-based template searching, SALIGN structural alignment, custom loop refinement, ligand modeling with restraints, and difficult low-identity modeling, ask for:
The advanced Examples 2–4 from the official Modeller tutorial that are beyond the scope of this course with ready-to-use Python scripts prepared by your TA (and can be provided to anyone with necessary background upon reasonable request.):
| Script | Purpose |
|---|---|
build_profile.py |
Search PDB database for templates |
compare.py |
Compare/cluster candidate template structures |
align2d.py |
Structure-sensitive target-template alignment |
model_single.py |
Build single-template model (5 models) |
evaluate_model.py |
DOPE energy profile evaluation |
plot_profiles.py |
Plot DOPE profiles with matplotlib |
salign.py |
SALIGN structural alignment for multi-template |
align2d_mult.py |
Align target to multiple templates |
model_mult.py |
Multi-template model building |
loop_refine.py |
Loop refinement with LoopModel class |
model_ligand.py |
Ligand modeling with custom restraints |
model_difficult.py |
Low-identity modeling (SARS nsp16) |
References
- Šali A, Blundell TL. Comparative protein modelling by satisfaction of spatial restraints. J Mol Biol. 1993;234(3):779-815.
- Melo F, Šali A. Fold assessment for comparative protein structure modeling. Protein Sci. 2002;11:430.
- Shen M, Šali A. Statistical potential for assessment and prediction of protein structures. Protein Sci. 2006;15:2507.
- Fiser A, Do RK, Šali A. Modeling of loops in protein structures. Protein Sci. 2000;9(9):1753.
- Modeller 10.7 Manual — Šali Lab, UCSF.
- Modeller Tutorial — Šali Lab, UCSF.
- ChimeraX Modeller Comparative Tool Documentation — UCSF RBVI.